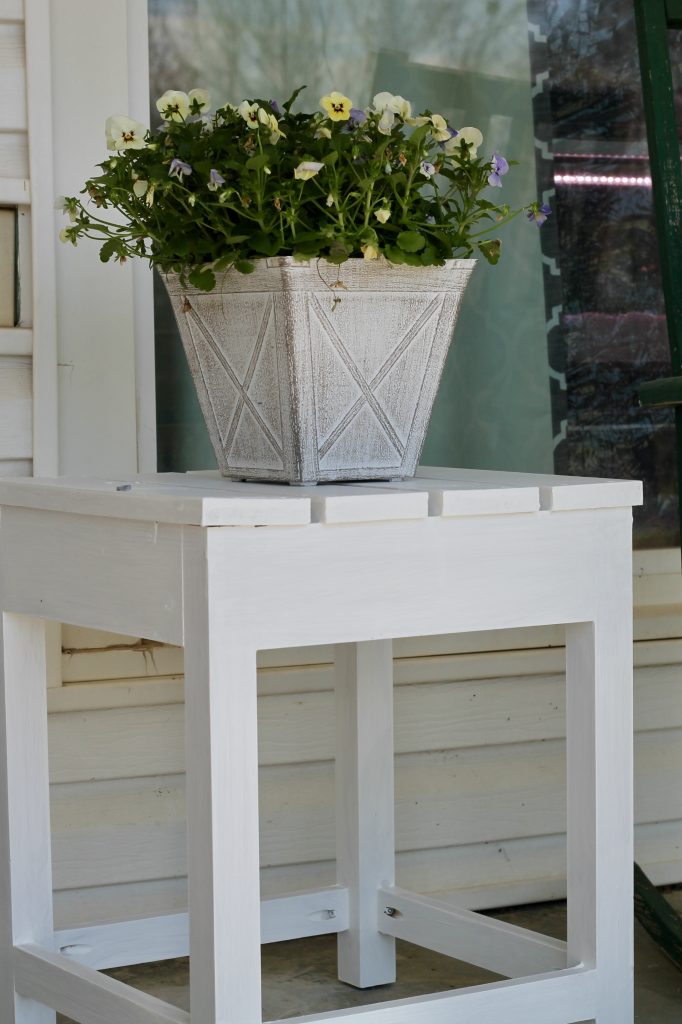
I am a sucker for beautiful front porches. A porch swing, a rocking chair, and somewhere to put my mason jar of sweet tea. I spent a lot of time on the front porch of our old house. I can’t wait to use the porch at the new house this summer. This DIY rustic outdoor side table is easy to build and makes your front porch the perfect place for a morning coffee or afternoon sweet tea. The side table can easily be built in an afternoon and will add some farmhouse charm to your front porch.
The site may contain links to affiliate websites, and we receive an affiliate commission for any purchases made by you on the affiliate website using such links. As an Amazon Associate I earn from qualifying purchases. As a Revive EO Affiliate I earn from qualifying purchases.
All I Want is Front Porch
My only request when we started looking for a home was a good front porch and by golly my husband delivered. I LOVE my front porch. During the summer, I am either in the garden or on the porch swing. I love listening to my pond fountain and the birds singing. Something about the porch calms my soul. It’s my happy place.
Mama and Papa gave us an Amish made porch swing when we bought the house. I loved it! We call it the airplane because when I was little that is what I called it. My brother and I would argue over who was the pilot and where we were going.
Then my mom gave me two wooden rocking chairs that her parents had given her. Mine is the third front porch that they have occupied. They looked perfect! I was excited that my porch was finally coming together, but something was still missing.
Although, I still needed a table to go between the chairs. I found an IKEA table that I put out there, but it was too tall and not very pretty. It worked ok to hold drinks while you rocked and flowers spruced it up a bit, but I didn’t like it. I found some online that I liked, but they were too expensive.
I showed my wonderful husband what I wanted and he set to work. Later that afternoon I had a rustic outdoor side table! I sanded it before painting it white. It looks so much prettier than my plastic IKEA table. Plus he used up some of the scrap wood we had stacked in the corner of the garage.
Pin it for Later!

DIY Rustic Outdoor Side Table Cut List
1×4
4 boards 15 ½ inches long
4 boards 12 inches long
2×2
4 boards 18 inches long
1×2
4 boards 12 inches long

DIY Rustic Outdoor Side Table Assembly
- First cut the boards needed to make the table. We used a miter saw for this.
- Then lay two of the 2×2 boards down. Place a 1×2 board between them about 2 inches from the bottom. Use pocket screws to attach this board to the legs. We used one inch screws for the entire project.

- Now place a 12 inch long 1×4 between the two legs. Make it flush with the top. Use pocket screws to attach this board to the legs.
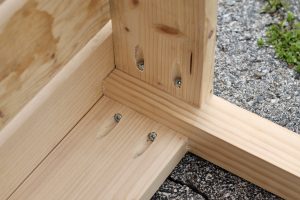
- Then repeat steps two and three until all the legs are attached with a small board at the bottom and a wide board at the top.
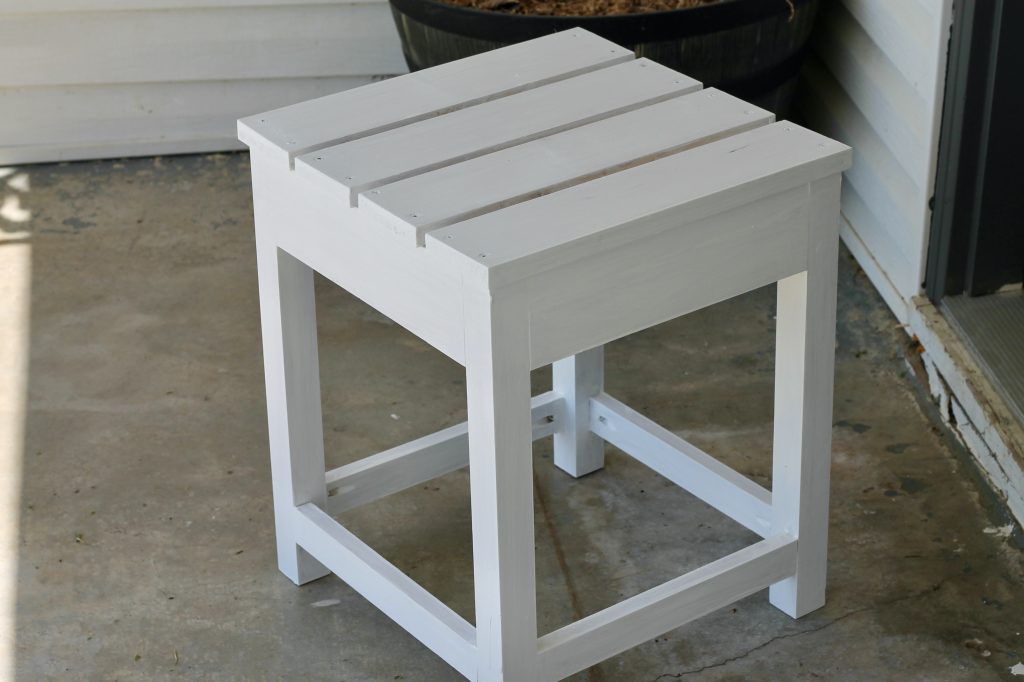
- It’s finally time to put the top on. The top is made with the 1×4 boards cut to 15 ½ inches. They will hang over a quarter of an inch on all sides and be spaced half an inch apart. Attach them at top and bottom with screws.

- Sand down the table with a palm sander and you are done!
Tips for Painting the DIY Rustic Outdoor Side Table
If you are going to paint the DIY rustic outdoor side table, then you need to make sure to use the right primer and paint. If you don’t then the paint will peel and you will have to paint it again next year, I highly recommend using the original Kilz or an oil based primer. My dad swears that you need two coats. Then you can paint it with regular exterior house paint. If you are painting the table white then go with an oil based paint by Rustoleum. Don’t forget to grab paint thinner to clean the brush.

The site may contain links to affiliate websites, and we receive an affiliate commission for any purchases made by you on the affiliate website using such links. As an Amazon Associate I earn from qualifying purchases. As a Revive EO Affiliate I earn from qualifying purchases.
Leave a Reply