Summertime has arrived, which means it’s time to pull out the red, white, and blue. Complete your porch with a DIY patriotic burlap wreath on the front door! This wreath is perfect for Memorial Day, Fourth of July, or Labor Day. You can put it up in May and leave it until September. That’s my kind of decorating!

The site may contain links to affiliate websites, and we receive an affiliate commission for any purchases made by you on the affiliate website using such links. As an Amazon Associate I earn from qualifying purchases. As a Revive EO Affiliate I earn from qualifying purchases.
Sweet Summertime!
School is out. The grass needs to be mowed. And the air conditioner is on all the time. Those all mean that summer has officially arrived. Decorating isn’t my favorite thing in the world. It’s fun once in a while, but isn’t something I spend a lot of time doing or thinking about. Therefore, I like to decorate for an entire season. From Memorial Day until Labor Day my house is done with red, white, and blue.
There are two places that I always decorate. One is the kitchen table and the other is the front door. I’ve already put out my red checked tablecloth on the dining room table along with a vase of flowers. My front porch needs a little something though. I’ve been looking for a good summertime wreath. I couldn’t ever find one that I just loved. So, I took to Pinterest for ideas. What I discovered was that wreaths are super easy to make. I saw a few that I liked and combined the ideas into my own DIY patriotic burlap wreath. It is now my favorite wreath and I’m making a second one for the back door.
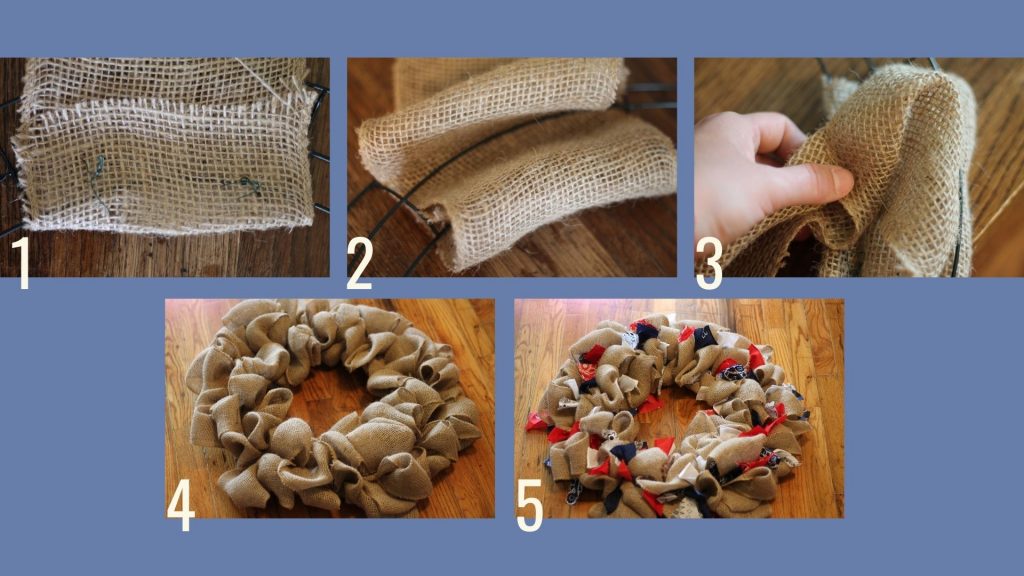
I’ve provided written directions and pictures for those of you that learn best that way. If you are struggling to understand how to do the burlap part of the wreath, check out this Youtube video. I found it very helpful when learning how to wrap the burlap part.
Pin it for Later!

How to Make a DIY Patriotic Burlap Wreath
Supplies
Red, white, and blue bandanas (one of each color)
Instructions
- Using floral wire or a pipe cleaner, attach the end of the burlap ribbon to the inner circle or the wire wreath form.
- Then pull a loop of ribbon through each circle, starting at the inside and working your way out.
- When you get to the outside, twist the burlap on the backside of the wire wreath form.
- Now repeat the loop making process next to the first set of loops. Continue doing this until the first section is full. Typically, four or five sets of loops will do. I prefer to make enough that they all bunch up instead of lay flat. It’s ok for them not to be a uniform size. In fact, it looks better to have a mixture of sizes.
- Continue to the next section making loops and twists. When you run out of ribbon, attach it to the back of the wreath using floral wire or a pipe cleaner, just like you did to start the first bit of ribbon.
- Next cut your bandanas into strips. Fold the bandana in half and then in half again. Cut along the folds so that you now have four squares. Now cut those squares into strips. Mine are roughly 2 inches wide, but I don’t actually measure.
- Tie them on to the wire wreath form as little accents. Just go until it looks good to you.
- Finally use one strip to create a loop to hang it up.
The site may contain links to affiliate websites, and we receive an affiliate commission for any purchases made by you on the affiliate website using such links. As an Amazon Associate I earn from qualifying purchases. As a Revive EO Affiliate I earn from qualifying purchases.
Leave a Reply